Sunday, 23 January 2022

PeopleSoft HCM Update Image 41 Released

Oracle has just released the latest PeopleSoft HCM Update Image 41. There are a number of new features PeopleSoft has been consistently delivering updates in every HCM module particularly on analytics side since last few images. In HCM Image 41 PeopleSoft has delivered a big update for Kibana analytics. Some other notable changes being Questionnaire Framework and Dependent Document Upload Approval.

Highlights of Image

  • Kibana for HCM : Analytics for Payroll for North America, Vaccination and Testing Tracking, Recruiter Pipeline and Administrator. 
  • Gender Identity and Expression : Allows employee to update their past and current Gender identity in Employee Self Service  
  • Manager Self Service - Team Calendar : Gives manager a calendar view of availability of their team's absences schedules, birthday and work anniversary in one place 
  • Dependent Data Document Upload and Approval : Allows employee to upload supporting documents when adding new dependents in Employee Self Service and Administrator can approve the same.
  • Questionnaire Framework Event : Adds questionnaire events for enabling Admins to provide questionnaire outside Activity Guide through email or notifications
  • Employee Acknowledgement of Job Profile : Allows employees to review and acknowledge their Job Profile.
  • Recruiter Search Enhancements : Faceted search for Recruiter and Hiring Manager
  • Applying GP France Changes Using Application Data set : Ability to review, package and migrate GP France DSN reporting changes through Application Data Set. 

Check out the video below to find more details on the new features for PeopleSoft HCM Update Image 41. 

.

Wednesday, 5 January 2022

PeopleSoft - Health & Safety - Employee Self Service Wellness - COVID Vaccinations Page

In todays post we will explore a new functionality which PeopleSoft has delivered in Image 40 to track COVID vaccines in PeopleSoft. The page allows employees to enter COVID Vaccination details from a Self Service page for Health and Safety module. The functionality also allows an HR Administrator to view, approve and edit record on employee's behalf. 

Setting Up Vaccines

PeopleSoft delivers configuration for standard COVID Vaccines approved by FDA in USA like Pfizer , Moderna and J&J . We will be setting up additional Vaccine type for COVID Booster. To review the existing vaccination follow the below setup steps.

Manufacturer

You can use this page to review and add any new Vaccine manufacturer (if needed) to appear as an option when employee adds the Vaccination details. PeopleSoft has delivered 3 manufacturers which are approved for COVID vaccine and other manufacturer for different vaccinations.

Navigation : Setup HCM Product Related > Workforce Monitoring > Health and Safety >  Manufacturers


I'm adding COVID Vaccine Booster manufacturer as Pfizer-BioNTech Booster

Immunization

This page can be used to setup Immunization like COVID or Flu Shot etc. So the COVID shot will have three manufacturer attached to the COVID Immunization which were setup in Vaccination setup page.

I'm setting up a COVID Vaccine Booster for our demo today.(refer to COVID Booster screenshot below).

Navigation : Setup HCM Product Related > Workforce Monitoring > Health and Safety >  Immunization


On the second page Self Service, ensure that you check the Available in Self Service check box so that the new option is available in Employee Self Service. If you want to give an option to employee to upload Attachments, you can click on Enable Attachments and click on Require Attachment Upload to make the attachment mandatory.


The page also has options for approvals in case you want HR to review the document before the information can be updated in PeopleSoft and also use Acknowledgement framework to ask employee to Acknowledge a statement.

Above are the two steps to validate/setup before you start using the COVID Vaccine Functionality to be used for Employee Self Service. Lets now see the the ESS part and Administrator part of the same.

Employee Self Service :

Click on Health and Safety tile and then Vaccination tile to add Vaccination details.


Vaccinations

Click on the + button on the Vaccinations page to add new Vaccination detail.


For our example we will select COVID-19 as Vaccination and provide necessary details and press Save button.


Once the employee submits the Vaccination details the status changes to Submit. 


The request goes for approval to Health and Safety Administrator. The security role which should be attached to Health and Safety Administrators  User Profile to receive approval request is Health and Safety ADM Fluid.

Approval by Health and Safety Administrator

Admin can approve the request from there Approval Tile. 


Once approved the status of Employee Vaccination will changes from Submit to Recorded.


Administrative Page

To view, edit Employee details Administrator can use the Manage Health and Safety tile on the Workforce Administrator Homepage.


Administrator can review Employee Vaccination details on this page and can make changes if required.


Tuesday, 4 January 2022

Data Masking using Page and Field Configurator - Part 2

In the previous part we covered the pre requisites for Data Masking using Page and Field Configurator. In this part we will see how to use Page and Field configurator for Data Masking.

Page and Field Configurator - Masking Page 

Use the Masking page on Page and Field Configurator to configure data masking for the component where you want user to masked data.

Navigation : Enterprise Components > Page and Field Configuration Page and Field Configurator

We are taking the example of PERSONAL_DATA component to mask NATIONAL_ID field.


 Add a new row on the criteria tab


Select Source Type as Page Fields and click on Select Fields.


This will open Select Field dialog page, on the page in the Primary Page field select the page which has the target field we want to mask. In our example we will select 01-Biographical Details.


Select the National ID field on the page for masking and click OK.


Press Save to add the Criteria to Masking engine.


Next page in the component is User List page which allows to specify exceptions to Data Masking. You can use this page to specify the Users or Roles of Administrators who can see the full data instead of Data Masking them. Select Level as Header Level to apply the changes to the full component.We are using HR Administrator role as Admin user in our example who can see data without mask.


Next switch to Map to Portal Registry page and select the Portal Registry Navigation on which you want the changes to be applicable. This page allows you to select pages on which the Data Masking should be applicable. Click on Apply Configuration to Save the changes.


This completes the step which has to be taken for configuring Data Masking in PeopleSoft. Lets login as a User to see the result of configuration. You can see the National ID is appearing as masked to a normal user.

Navigation : Workforce Administration > Personal Information > Modify a Person              


Hope this series gave you an insight on how to configure Data Masking using Page and Field Configurator . Do let me know if you have any questions/comments on this post.


Data Masking using Page and Field Configurator - Part 1

In the one of the previous posts we saw how to mask data for sensitive fields in PeopleSoft . One drawback of the feature is PeopleSoft only delivers the data masking functionality for a limited number of fields. If a HR Administrator wants to mask fields which is not delivered by Data Masking module, they can use the Page and Field Configurator to mask data for such fields. In today's post we will discuss how mask fields using Page and Field Configurator. The functionality requires People Tools version 8.57.11 or higher.

What is Page and Field Configurator ?

Page and Field Configurator is a configurable framework which gives the user ability to make certain changes to fields on the page like modifying labels, hiding fields ,setting default value for the field . All the changes can be done through PIA without using Application Designer.

1) Steps for using Page and Field Configurator for Data Masking

If you are currently using the Data Masking functionality in PeopleSoft ,ensure the Data Masking option is turned off on Installation table .On the HCM Options page uncheck the Enable Masking check box.

Navigation : Setup HCM > Installation Table > HCM Options


2)  Define & Configure Mask Profile

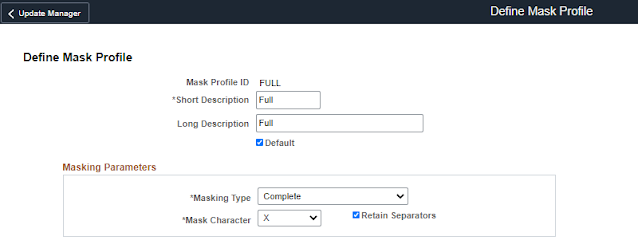
PeopleSoft delivers Mask Profile which can be used to Define Mask Profile for the field for which Data has to be masked.  Use the Define Data Mask Profile page to setup data masking profile. You can setup four types of Mask Profile .Oracle delivers Mask Profile of each type . Mentioned below are the mask profile as delivered.

  • Complete Masking.

  • Trailing Character Type Masking (Partial Masking).

  • Date Type Masking.

  • Setup Table Based Masking.


As of now 'X' and '*' are the supported masking characters by PeopleSoft.

Navigation : Enterprise Components > Page and Field Configuration > Define Mask Profile

Complete Masking

The field will be completely masked and no data will be visible . Ex- An SSN 145-31-1197 will appear as XXX-XX-XXXX .


Trailing Character Type Masking

Trailing characters on the field will be masked based on the configuration selected. You can configure the number of characters you want to make visible . Ex- An SSN 145-31-1197 will appear as XXX-XX-1197. 


Date Type Masking

Trailing characters on the field will be masked based on the configuration selected. You can configure what portion of the Date, Month or Year has to be masked.


Setup Table Based Masking

Use this masking profile to mask data from a defined setup table that has the masking format defined in it. For ex - This allows you to mask one field (NATIONAL_ID) which appears on multiple tables all in one place with the same mask format using the Mask Format Field. 


3)  Define Field Groups for Masking 

Use the Define Field Group page to assign default masking profile to similar fields so that they appear masked in uniform fashion all through the application. This is an optional configuration but helps to standardize the format for similar fields.

Navigation : Enterprise Components > Page and Field Configuration > Define Field Group


This completes the Part 1 of the pre requisition configuration. In the Part 2 we will see how to use Page and Field Configurator to do Data Masking… (To be continued)

Sunday, 2 January 2022

Data Masking in PeopleSoft PS Query Output

In the last post we saw how to mask data for sensitive fields in PeopleSoft. However there was an open loophole in this. Even though the user can see the data as masked on PeopleSoft page ,they can still see the data unmasked in PS Query output. To close this gap PeopleSoft has also introduced the functionality of masking sensitive fields in PS Query output in People Tools 8.58.02 . In this post we will see how to setup data masking on PS Query output.

Enable Query Masking

Use the System settings page to enable or disable Query Data Masking.


Authorized Roles for Query Masking

Next we will setup the roles which are authorized to see unmasked data in the PS Query output. The users who have access to these roles can see unmasked data in PS Query output.

Navigation : Enterprise Components > Data Privacy Framework > Query Masking > Query Masking Authorized Roles


You can use this page to add Record & Field combination for which the users should be able to see data masked. I'm using an example of National ID (NATIONAL_ID) field from PERS_NID record and marking it as Authorized. This will allow only user who has HR Administrator role to view the field data unmasked in PS Query output.

Synchronize Data for Fields for Data Privacy Mapping 

Use the Synchronize Data page for synchronizing data privacy mappings In Data Privacy Framework with the PeopleSoft Query system and authorized roles and their access to sensitive record fields. PeopleSoft has delivered the Application Engine EODP_QRYMSK is responsible for updating the data privacy mappings.


This completes the steps which has to be done to setup data masking for PS Query output.

Demo

I have created a query on the PERS_NID table and selected National ID (NATIONAL_NID) field and you can see the field is coming as masked in Query output for a normal user who does not have HR Administrator role attached to their User Profile.


Running the same query from HR Administrator who has the authorized role attached to their User Profile will show the National ID field.

PeopleSoft HCM Update Image 41 Released

Oracle has just released the latest PeopleSoft HCM Update Image 41. There are a number of new features PeopleSoft has been consistently deli...